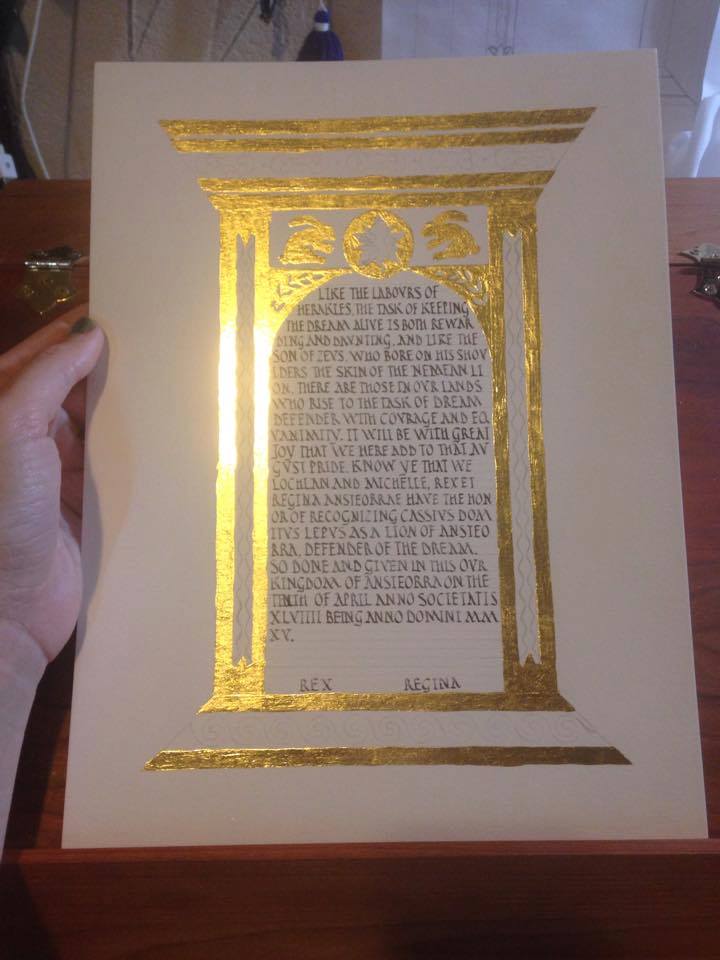
Rabbit’s Lion Scroll

Hey guys! I have this scroll I did, but the person who commissioned it (Her Majesty Michelle) asked me to keep it under wraps until it was finished and given. But now that it has been, I can talk about it! The person in question has a Roman persona, and is often called Rabbit. I wanted to incorporate both of those things into his scroll.

I started off looking at pediments and tabernacle frames. Technically, the one I used for the most inspiration is a Renaissance creation, but it adheres to classical lines, so I went with it. I also looked at mosaic designs and repeating motifs from Pompeii and other Roman sites to add interest to the columns and pediment. I also found some interesting examples of Roman rabbits, and of course, the award badge had to go in there. too. I sketched out my design on graph paper, drawing in one of each motif, since they will get mirrored in the final design, and adding in a branch of Laurel leaves to reference his peerage.
DSC05311

I traced out the text box on another sheet of graph paper and played around with nib size and line spacing until I got it right. This hand is based on the Roman Rustic Capital alphabet in Marc Drogin’s book, although some of the line height and spacing was changed both to make it easier for me to write and to look more like the period examples shown. It only took me two tries to get it right! DSC05307

I did somehow manage to get my initial draft off by an inch (the scroll is on 9×12 Fabriano hot press watercolor paper, but my draft was only 9×11), so the scroll is an inch longer than I’d planned it to be. It changed the proportions a bit, but gave me enough room to add in that line in the middle margin that I didn’t have room for in the draft.  Rabbit's Lion Scroll

Next up: gilding. I used miniatum as the substrate, and patent rather than loose leaf gold. Patent means that it comes attached to a piece of tissue paper, so you’re not fighting with tiny pieces of tissue thin gold that falls apart with every breath you accidentally blow on it. After the gold is finished, time for painting!
Rabbit's Lion Scroll

Rabbit is a skilled artisan (there’s a reason they made him a laurel!) and scribe. I wanted to up my game for this scroll, so I used the period pigments that I have been studiously ignoring for the last year. It’s part of my goal this year to work more with period materials and techniques, and I figured: why not start here? Lion scroll progress.

About halfway through laying the flat colors. The paints I used were from Scribal Workshop and Griffon Dyeworks: ultramarine blue, cadmium red (don’t lick your paintbrush!), viridian green, and black. I also used a gold bronze-powder paint to add the dots at the very end. 
Lion scroll progress.

And, finished. I didn’t do any shading at all in the flat areas; I liked the way they looked with flat, graphic colors. The point of the colored areas is to offset and highlight the gold.

Rabbit's Lion Scroll

Detail shots: You can see how I didn’t manage to get the miniatum 100% smooth under the gold leaf. That’s something I need to work on, and I wonder (since I was trying to go flat gilding as opposed to raised) if I should have used garlic juice instead. But I thought the miniatum would stick better. Next time I’ll thin it out a bit before laying it, and see if that helps the smoothness.
Rabbit's Lion Scroll

Words. I wasn’t terribly precious about line breaks, preferring to keep a nice full wall of text. Romans didn’t care particularly much about having line breaks in awkward parts of words anyway. My friend Cecilie told me I should have omitted vowels the way they did too, but I said I wanted viewers to be able to actually read it if they tried.

Rabbit's Lion Scroll

Loving the clean lines and bold colors.  Rabbit's Lion Scroll

It was really hard to try to photograph the shine of the gold. Either it got blown out completely, like this: Rabbit's Lion Scroll

Or the rest of the picture was terribly dark, like this. Suffice it to say: it’s SHINY. Design to finish, this scroll took about 15 hours. Rabbit's Lion Scroll

Gilding the Lily

I got some new gilding substrate recently, miniatum, and I wanted to test it out. I made a basic ‘a’ letterform, gently raised, to gild. I waited for it to dry, then used some fairly inexpensive Thai gold I got on eBay to test it out.

20131105-181809.jpg
As you can see, it worked perfectly, resulting in a lustrous mirror shine with only one layer of gold, and minimal burnishing.
20131105-181835.jpg
I did kind of accidentally gild my finger, though.

Scribal Playdate, Part the Second

When last we left our intrepid scribes, they were taking a wee cordial break. After we finished imbibing, it was time to make some iron-gall ink. First we started out by grinding Aleppo oak galls (you can use domestic US oak galls, but you have to use so many more because they are not as tannic as the Aleppo galls) into a coarse powder.

Scribal Play Day

Scribal Play Day

Scribal Play Day Scribal Play Day

When they reached the desired consistency (above), we brewed them into a tea for about ten minutes (below). Oak gall tea smells about how you would expect it to. Scribal Play Day

After the tea was done, we strained the gall-pulp out.
Scribal Play Day


Then we added the copperas (copper sulfate), which turned the brown tisane dark lavender-black.

Scribal Play Day


Then we dissolved some gum arabic and added it to the mix, to help with flow and consistency.

Scribal Play Day Then another straining. You can see how deeply purple-black the liquid is. After this, I think we added a tiny bit of red-wine vinegar (I forget why), and then it was ink!

Scribal Play Day


After that, we made quills. The lower shafts were soaking in water to… I can’t remember. Keep them supple? Something. We didn’t end up hardening these quills because we didn’t have sand (oops!) but they’re just more flexible that way.
Scribal Play Day

We started out by stripping the barbs off of the rachis (what the quill is made from). I liked leaving a little tuft at the end. It looks so jaunty.
Scribal Play Day Scribal Play Day

One of the things that has to happen is that you need to pick a feather that feels good in your hand. It’s no use cutting a quill that is uncomfortable.
Scribal Play Day

My preferred quill-cutting tool is a scalpel with a #10 blade. They’re very sharp, the blades come in packs of 100, and they’re pennies compared to X-acto blades.
Scribal Play Day

We make an initial long cut, and pull out the inner pulp. It looks like a snakeskin.
Scribal Play Day

Then we shape the shoulders of the quill. I took this picture specifically to remember the shape of a well-cut quill. After this, we cut the slit and the flat nib tip. Et voila: quill!
Scribal Play Day

They make awesome fashion statements.
Scribal Play Day

After the quills were cut, the gesso was dry enough to gild. I forgot to get a picture of the smoothing process, but we basically just used our scalpels to scrape the surface smooth; every imperfection is a place where the gold will potentially not stick. Then we breathed on the gesso with deep tummy breaths (Penelope told us to pretend we were Aslan breathing on the stone statues). Then we took our patent gold (the kind with the paper on the back) and plplaced it gold-down on the gesso letters.
Scribal Play Day

We rubbed the back of the gold through silk fabric, and then burnished the gold letters with agate and hematite.

Scribal Play Day It was soooo shiny. Scribal Play Day Then we used our new ink to write the rest of the quote in. Mine was my motto, which SHOULD read Deus Pascit Corvus, or ‘God Feeds the Crows’. Then we were done! I have since added more finishing touches, but that is another post.
Scribal Play Day

Gesso and Gilding

Remember when I went to KWHSS and took classes on gesso and gilding? Well, I thought I’d try it at home to see if it worked as well as I hoped (hint: it didn’t).

I reconstituted the mostly-dried gesso unto a thin paste and painted up some pretty leaves and an illuminated letter. The off-white is sheep parchment, the white is bristol board.

Gesso experiments on sheep parchment and Bristol board. In my haste, I didn’t smooth out any of the gesso, so the fake gold leaf didn’t stick very well at all. I am given to understand that the fake gold doesn’t much like to stick to anything. Also, the gesso didn’t re-hydrate very well either, even after nine or ten deep breaths. Normally a couple of deep breaths blown open-mouthed (my friend Penny says she likes to pretend she’s Aslan) onto gesso has just enough moisture in it to make the surface tacky, so the gold will stick.

Hm. Gesso results are disappointing today.


I tried another layer of gesso (bottom right corner as we look at the above picture) and some garlic extract (top right corner), and while the situation improved, it wasn’t totally successful. Then Cat, the lady who taught the gesso class, told me I should really smooth out the gesso, as all the lumps and bumps create spaces that the gold leaf can’t get into to stick.


Better results this time, after smoothing the gesso. Still a little shaky around the edges, but it improved greatly.

I tried it out and it worked like a dream. It’s still a little rough around the edges, but still. Improvement.