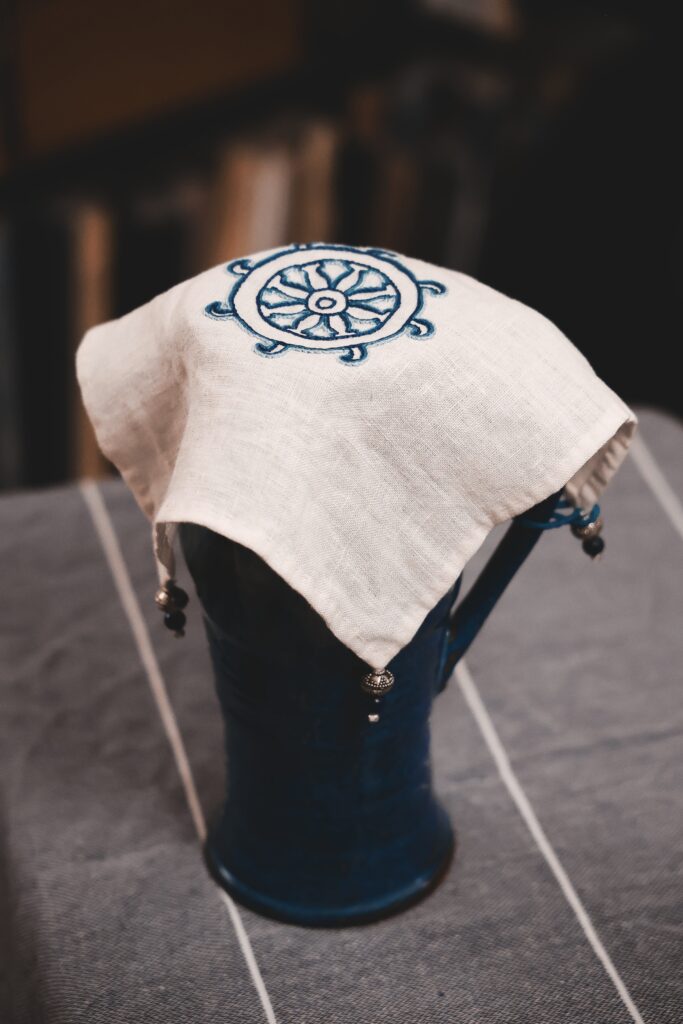
Lucet Cords (three and a half ways!)

Tutorial Time-Stamps
Basic Cord (turned): 00:03:18
Basic Cord (wrapped): 00:05:19
Beaded Cord: 00:08:35
Two-Color Flat Cord: 00:17:00
Two Color Round Cord: 00:25:45

IN WHICH our intrepid recreatirix walks through how to make lucet cords a few different ways. I’ll cover making the basic cord (both turning the lucet and keeping it stable), making a beaded cord, and two different ways to make two-color cords.

My apologies for the weird sound issues, sometimes YouTube decides to mess with background/voice-over levels and unfortunately there’s not much I can do when that happens. If you have sensory processing issues I highly recommend availing yourself of the closed captioning for this vid.

Steps Backward: Viking Acanthus Collar

So remember that pretty embroidered collar I had all planned out yesterday? Well…. It’s had some setbacks.

Master Alden and I had decided on blue lines for this lovely design. And seeing how much fun I’d had with pearl cotton on the Cantigas pouches, I thought I’d use it again. I had some beautiful robin’s egg Pearl Cotton 5 (I’d thought about using silk, but these are knock-about tunics that need to be super washable) that I wanted to use. I thought that chain stitch would yield a line too wide even for this large graphic a design so I started in on split stitch.

Acanthus Collar

It looks great! The color pops on the brown! Everything is dandy! So I kept going.Got about a quarter of the way done… Aaaaand start to not like the way it looks.


Acanthus Collar

The pearl cotton is round and, for lack of a better term, bouncy. It wants to stand up from the linen as I stitch it. Until it collapses on its side around the curves. See how it’s sort of falling over up there on the top curve of the vine? And again in the curves of the leaf shapes at the bottom and left? It looks terrible.
Acanthus Collar

I cut all the top of the embroidery off. Luckily the tall, bouncy nature of the embroidery makes this very easy.
Acanthus Collar

Taken off the fabric, this is what’s left of the yesterday’s embroidery. It’s important to document the screw ups as well as the successes, right?!
Acanthus Collar

I started again with four strands of DMC cotton floss in a slightly bluer color (which I and Master Alden both agree looks better, and will look better against the green tunic fabric). It lays much more nicely, and is still linear and graphic in the way we were hoping for.
Acanthus Collar


New Project: Viking Collar

I started another project today, a quick viking collar for a tunic with a damaged neckline. The inside of the tunic will be patched, and the outside will be hidden by this collar. It will be embroidered in blue DMC cotton for washability, and the tunic is forest green linen. I’ll add some matching blue embroidery on the cuffs of the tunic to make it coordinate.

Viking Collar

The design is based on one of the Mammen embroideries, an acanthus vine that’s small and solidly embroidered in various colors. However, I found this tunic on pinterest, and loved the spare, graphic outline of the same design.

2015 Wrap Up

It’s a new year! While I am usually overwhelmed by possibility and eager to start the new year’s projects, this past year has ended on a difficult note for me, personally. I am having a hard time being excited about 2016 and what it will bring. I want to take a minute or two to look back at my finished projects for 2015.

Head CLoth

Embroidered Head Cloth for Dena:  A quick and sweet little embroidery/handsewing project for a friend, with elements of her heraldry on the back.

Sabina's Court Barony Scroll

Court Barony Scroll for Sabina: A tongue in cheek, fun scroll for a friend’s Court Barony. My first real scribal commission. The first time I’ve ever deliberately defaced my scribal work.

Prick and pounce tutorial, for Opuselenae.com

Prick and Pounce Tutorial: I’m counting this as a project because I feel strongly about the roll of tutorials and sharing knowledge in educating people. Still my favorite way to transfer patterns.

Rabbit's Lion Scroll

Rabbit’s Lion Scroll: First time really experimenting with pigments treated in a period manner, first (semi-successful) gilding on a scroll.

Red Crow Cup Cover

Badge Cup Cover: My heraldry passed, and now I want to put my badge on ALL THE THINGS. Starting with this cup cover, that attaches to my goblet stem so I don’t lose it.

Dragon Pouch

Dragon Pouch Collaboration: A fun little thing I did with my friend Lia to sponsor a fighter in a tournament where the buy-in was an item made by an artisan (or two!).

invites

Queen’s Champion Invitations: Last minute call to make pretty invites for an event.

The embroidered pouches are all finished!

Cantigas de Santa Maria Pouches (and part two): An artisan trade with a friend, based on two pouches from a medieval manuscript.

C&T

Cut and Thrust Championship Scroll: A kingdom-level award scroll based on a renaissance fencing manual plate.

These aren’t all the projects I’ve don’t this year, but they are all the ones I’ve blogged about.

Sewing Red Hose

I blogged about these red hose in progress, but I need to do a completed project post for them and the ginger version.

roman

I made myself a beautiful Roman outfit.

achievement The write up for this ridiculous scroll is coming. I promise. It may be two or three entries long. It was a monster.

My maiolica plate, finally fired. Only a year after I painted it! Fingers crossed that this one won't break; third times the charm, right?

Finally managed to fire this plate (third time’s the charm, right?) It lives on a shelf high up and away from danger.

poem

Calligraphed a poem for a very dear friend.

heraldry

Worked hard on learning to be a proper heraldic artist.

??

Wrote out the calligraphy for the invitations to our Baronial fall event.


collar

Finished this monstrous endeavor. It ended up being shorter than I thought it needed to be initially, which made me cry, but it turned out okay in the end. Write up coming.

veil

Made a 14th century frilled veil. That I kind of hate and want to remake.

kintsugi

Practiced the Japanese art of Kintsugi.

garter

Made a pair of garters for my friend Cecilie.

callig

Calligraphed this award, which is not for the SCA (but still looks amaze!)

All in all, it’s been a productive year. I think I’ve missed a couple things, actually. Next up will be discussion of some projects I’m hoping to accomplish this coming year, and some changes I’ll be making to the site. Happy New Year, everyone!

Cantigas de Santa Maria Pouches, Part Two

When last we left our project, I’d finished up the embroidery on the first pouch, and I’d sketched out the diamonds on the yellow linen (the last of the linen from my Byzantine dress [have I seriously not blogged that either?! What is WRONG with me?], except for what I’ve held back for lining the cuffs, whenever they get finished).  . Digression aside, I basically marked equal spaces along each edge and connected them, leaving me with a lovely diamond grid to embroider.   . I only did one line of chain stitch. Since the overall motif was much denser than the other pouch, I didn’t think it needed bolder lines. Here it is all finished, ready to be sewn up.  . I lined both pouches (but forgot the take pictures) with coordinating linen by laying the pieces right sides together and machine sewing at the seam allowances. I clipped the curve of the cover flap and then turned them right side out and pressed, not unlike the Double Eagle Pouch I made some time ago. But that braided finish is a pain in the neck, and I kind of hate doing it, no matter how fantastic it looks.  . So instead, what I decided to so was whipstitch the pouches closed with a thread that matches the outer fabric, so as not to be so noticeable, and then just do a decorative chainstitch along the edges of the join, to mimic the braid stitch without all the fuss. I did this on the dragon pouch too (technically after these were done, but I did blog that one first), because I really liked the effect.  Finishing up the edges of the pouch with chain stitch. I added long shoulder straps in the lining fabric, as shown in the manuscripts. The strap ends were doubled over to create a smaller footprint when attached to the pouches. The red ones were sewn to the back, and the blue ones were inserted into the pouch and sewn to the lining. I’m really pleased with the way they came out and I want to make a million more of them.  The embroidered pouches are all finished!

And the chest that Juan Carlos made for me? It’s beautiful! IMG_1714

Cantigas de Santa Maria Pouches, Part One

For a while now, I’ve been wanting a six board chest, in which to keep my feast gear and other sundries at events. I have resigned to myself to the fact that I don’t have time to do all the things I want to do. And even more importantly, I don’t have to do the things I don’t have any interest in doing, even when the outcome of those activities is a thing I want or need. I am not a wood worker, and I don’t really want to cultivate those skills right now. So I put out a call-out to my reenactment friends, to see if any of them would be interested in doing an artisan trade.

Master Juan Carlos, a Laurel in my local Barony, let me know that he’d be willing to make a chest for me (I’d already seen and admired one that he made for himself, so I was excited) in exchange for a couple of embroidered pouches similar to those from the Cantigas de Santa Maria. I looked through the illuminations he sent me and settled on two designs. One like this, with a pouch flap and a neat rounded motif…

cantiga-maria-1

And one like the yellow ones below, with no flap and a diamond design.  cantiga-maria-2 I picked out my colors (red and black on natural linen, and indigo blue on yellow) and sketched out my designs on the fabric. I decided to go with DMC Pearl Cotton, since I have a metric ton of it, it launders well (I try not to use delicate fibers unless I know who they are going to), and makes a nice bold clean line.
New handwork project, for Master Juan Carlos.

I decided on chain stitch, as it makes the boldest line with a single row of stitching, and the designs are all linear. I also started off using a hoop, but gave it up as I found it was more trouble than it was worth. This red and black design has the flap motif incorporated into the back; the pouch flap will fold over at the top of that line, halfway through the circle.
Working on my embroidery art trade tonight.

The pouch laid out, so you can see basically what it will look like when it’s all folded up.
. . . I finished up all the red, and then began the black, just embroidering another line right next to the one that had already been done.
.

I really like how they look together; so bold and graphic.
.

All finished up with the first embroidery, about to start on the second. Part two will be the second pouch embroidery and how I made them all up. Tune in Monday!

.

Fox Embroidery Pattern

Remember that fox embroidery I did, back in the day? The one, I uh, apparently never posted finished pictures of? Huh. I should do that. Only three years late…

This was for a Sable Swap a couple years ago. The recipient was an embroiderer and had a Kievan Rus persona. I know what it’s like to never have pretty things for oneself, after giving them all away. So I wanted to make a little kit that was relevant and useful and pretty. It consists of a pouch, a needle roll, and a scissors fob.


Rus Embroidery Project

The design for the pouch was taken from Kievan temple-brooches from the relevant period. Most of them show animals or saints mirrored. I went with foxes, since the recipient listed those as favorites. Embroidered in split and chain stitch with DMC cotton floss. Rus Embroidery Project The needle roll was embroidered with a dragonfly (also a favorite) and some Kievan motifs to tie them in together, with a blanket stitch in varying long and short lengths to be a decorative finish. Rus Embroidery Project The scissors fob echoes the shape of the temple brooches, and has a lucet cord loop to attach to the scissors.  Rus Embroidery Project So. Now that that’s done, even though I didn’t necessarily intend to do a project recap in this post, let me show you why I DID want to write today. I finally cleaned up the fox brooch motif. A few people have asked for it, and I’ve forgotten about it multiple times. So here it is! Enjoy! fox-embroidery-1

Dragon Pouch

Ave, everyone! I know, it’s been a bit since I’ve written. Life got busy. But I thought I’d take a minute and post about a little collaboration project I did with my friend Lia. Our local Barony had its fall event over Halloween weekend. One of the fun things that happened was that every fighter that wished to compete int he Championship tourney had to be sponsored by an artisan, who was in turn required to make a small thing to add to the prize baskets. Lia enjoys embroidery and she and I agreed to collaborate to sponsor a fighter with an embroidered belt pouch.

She told me in advance how big the dragon would be (about 1.5×2.5 inches) and I didn’t want the pouch to overwhelm the tiny embroidery, so I decided to make it the perfect size to hold a cell phone on a belt. I know many people have issues with modern tech being visible, but I know too many people who NEED to have them handy. My friend Helene uses her mobile to monitor her diabetic son’s blood sugar levels.
pouch1

I measured some linen in coordinating colors against my own phone, leaving a rounded fold-over flap , and then appliquéd the embroidered dragon to the outer layer.  pouch2 And finished off the edges with a quick chain stitch border. pouch3 Then I sewed the outer fabric and lining together with right sides facing each other, and turned the pouch right side out, and ironed everything. Oh gosh, I need a new ironing board cover. At this point, I also added a loop on the back to thread the belt through. I forgot to take pictures of it, but it’s a very simple belt loop.
pouch4 I whip stitched the edges of the pouch together, and then finished it with a chain stitch along the side. The inner edge and the flap were finished with a simple running stitch. Et voila, a lovely cell phone belt pouch. I liked collaborating with Lia on it, and I am excited to do some more joint projects in the future.
pouch 5

Finished Project: Crow Cup Cover

It’s finally finished! I’ve had this as my SCA on-the-go project since Gulf War (which was in February, so it’s been a minute). I decided that I wanted to get it finished and usable, so I did a stitching spring to the finish line. Red Crow Cup Cover

I ironed the cover, but it sat in the hoop for so long that it still has the imprint. I’ll hit it again with some steam before I take it out to an event.
Red Crow Cup Cover

Close up of the crow. My badge (heraldry lesson: your coat of arms is meant to signify YOU or someone you have designated to speak for you, your badge is what you put on things to signify ownership of them) is “fieldless (no background), a crow rising gules (a red crow taking flight).” I want to put it on ALL THE THINGS. Red Crow Cup Cover

The hoop ring disappears nicely when it’s on the cup.  Red Crow Cup Cover

My innovation for not losing the cup cover; a simple lucet cord attached to one corner and sewn into a loop that hook onto the bead to keep it in place.
Red Crow Cup Cover

I attached it to the corner that would keep the crow moderately upright when it hangs, preserving the display of the badge. Cause I’m clever! Red Crow Cup Cover And cause everyone always wants to see the back… I did try to make sure that it was neat, because it will be visible. I am not always so neat when the back will be hidden, such as on a collar or bands on sleeves. Pieces in period are not as neat as we generally imagine, and I am sad when people kill themselves trying to make the backs as neat as the front.


In Progress: Bliaut Collar

Have I really not blogged about this beyond showing some samples? I know I’ve talked about it a BUNCH on the Facebook page (good reason to follow me there; I tend to post small updates on things that don’t make it to the blog as finished posts). It’s about time I did, then, since I’ve recently taken it up again.

When I made my twelfth century bliaut, I knew I wanted it to have a beautifully embroidered collar, a la Racaire’s lovely work. I did some research into pretty scroll-ish vines and found the tails of the mitre of Thomas a Beckett. I picked one singular motif (since they change in size from top to bottom) and played around with it in Photoshop until I had a template I liked. I printed it out (it’s so much bigger than I thought it would be!), and followed my prick-and-pounce technique to transfer the design to the red-orange linen I used on the lining of the bliaut.

Bliaut Collar Progress

Remember back in the day, when I bought these threads? I had it as my plan to use the green and purple for the embroidery on this collar. The lime green and red-orange is not an intuitive choice to the modern eye, but the medieval aesthetic is FULL of crazy color combinations. I started off using split stitch on the fill. I didn’t like how the clover-leaf finials were coming out, though, so I cut them out and redid that one there.
Bliaut Collar Progress

Here you can see the new clover finials, and the progress. I added in some additional ink lines in the middle of the Y-junctures of the vines, to help guide my stitch direction, which was a really handy thing to do.  Bliaut Collar Progress One side of the green all finished. It’s sitting at about 16:30 hours of work in that picture. 
Bliaut Collar Progress

I wasn’t sure exactly what I wanted to do with the border, so I bought a darker version of the green fill. At least, it looked like the same color, but when I stitched it on to test it, the border green looked SO much more yellow. So, that’s not gonna work. I cut it out and decided to go with the purple instead. Bliaut Collar Progress Finished up the stem-stitch outline on the vine here. I thought about doing the border in stem stitch too, but it actually looked better in split stitch. I’m still debating what to do in the center of the border squares, but I have a bit of time before I have to decide. I could do a satin stitch square, or a small square outline, a pearl in the center, or I could just leave it as it is. I’ll figure it out at the very end.
Bliaut Collar Progress About halfway done with the second side green stitching. Aaand, that’s where it sits for AGES. I got busy with other projects and put it on the back burner.
Bliaut Collar Progress

But I missed working on it, so I decided to devote at least ten minutes of embroidery time on it per day. I think I’ve worked more on it the last three days than I have in the last six months. I don’t think I’ve stitched less than an hour on it since I started working again.
Finished up the last green spiral where the embroidery sits now. Threaded up the needle to finish up the purple so I can advance it to the next bit.

This is where it is right now. I’m almost done with the purple, and then I’ll advance it to the next, clear section to keep working. It’s gonna be daunting, I think, to see a whole new blank space (and to know that I probably have another three “blank” sections to go, not counting the sleeve sections, before this is finished), but I will persevere in my ten minutes a day resolution until it’s finished.  Bliaut neckline. 45:58 hours. Http://opuselenae.com Time invested so far: 45:58 hours.